Sproutingfam.com is supported by its readers. If you purchase through a link on my site, I may earn a commission. Learn more
How To Start A Compost Pile (+ Infographic PDF)
Learning how to start a compost pile is the single best thing you can do if you’re just getting started with growing things. Whether growing food, flowers, vegetables or herbs, compost is necessary.
Whether growing from pots or from the earth, compost piles will make them flourish!
How To Start A Compost Pile
When we first started growing vegetables and herbs, it did not go too well for at least half of the vegetables we planted. Some that did survive that first summer barely made it through. We watered them good and the soil appeared alright when it was wet. But in reality the soil was just rock hard dirt. It’s surprising some of them did survive.
The solution to all this is plenty of organic compost.
Learning how to start a compost pile made a night and day difference for us because we had very hard dirt. No till gardening relies on a good amount of fresh compost, at least when getting your beds going.
Compost adds nutrients to soil, helping to break up hard and heavy dirt.
That’s why many call compost, “black gold”.
It helps turn hard dirt into living soil.
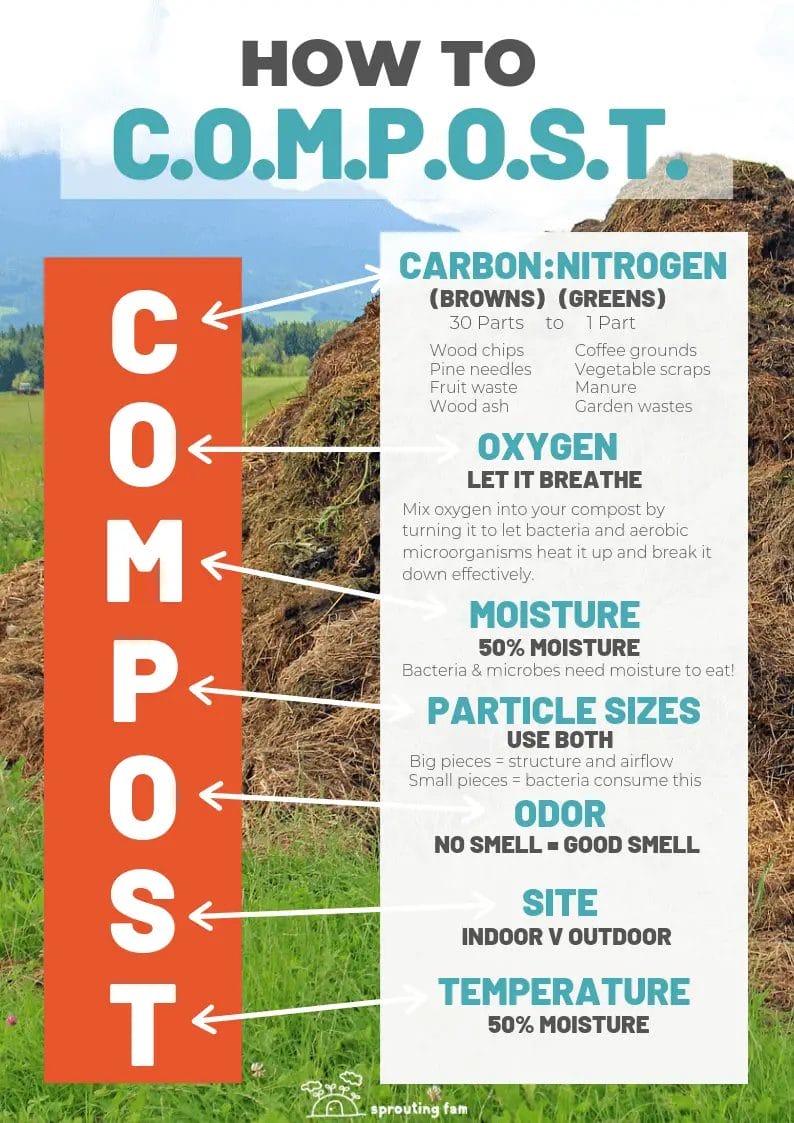
(copy embed code below to use the infographic)
Share this Image On Your Site
Traditional no-turn compost piles are the easiest ways to make compost.
You can turn the pile once a week or so to make it ready sooner.
Turning the pile feeds it oxygen.
It increases its inside temperature which makes bacteria and aerobic microbes consume the stuff inside your compost pile faster.
Just pile up a bunch of food scraps and leaves and you’ll be good.
There are MANY different ways to create high quality compost for your garden. And they’re all basically the same at the end of the day.
- You take organic matter
- Pile it up
- And then just let the microorganism go to work
- They eventually decompose it…
- And you’re left with a glorious, odorless, crumbly material that’s chock full of nutrients that both plants and soil love and need.
The following list are the intricacies involved in diy backyard composting, but there’s no need to really obsess over them at all. Chances are, your compost pile will come out good without knowing much about carbon:nitrogen ratios:
- aerobic and anaerobic microorganisms
- ingredients (carbon, nitrogen, oxygen, water),
- ingredient ratios
- temperatures
- oxygen levels
- the types of compost (green waste, animal waste, human waste/manure etc.)
- the different methods (trench composting, compost piles, single bins, 3 part bins, vermicomposting, composting toilets, Bokashi, more).
That’s why I like just making a fat pile and letting it do its thing. You don’t have to know about any of this stuff. Just simply make a big pile of plant and food waste and you’re likely going to be good to go soon after. This is the beauty behind learning how to start a compost pile the traditional way.
Composting Benefits
Compost piles provide you with organic fertilizer that has the power to make hard dirt, soft, and sandy dirt, more stable and able to grow from.

IDEAL SOIL STRUCTURE: If you have hard dirt like us, it helps break this down and make it more porous. If you have sandy soil, compost can help it retain soil. It’s the major mediator in whatever soil type you have. Compost will make hard dirt or sandy dirt, better and easier to grow from.
ORGANIC SOIL COMPOUNDS: Organic compounds and matter within soil are increased with compost.
MAINTENANCE FRIENDLY: The turned compost pile requires the most labor with the turning. But the added time it takes for piles to decompose is worth the lack of effort needed to put into them.
Keep in mind that the whole concept of Korean Natural Farming which works so wonderfully, is that you want to stick to local elements from your own backyard.
Whether you’re creating liquid fertilizers at home or starting your own compost bin for a garden bed (it even makes some of the best potting soil for container gardening),
…using free fertilizers made from organic “waste” materials helps promote healthy soil and makes growing anything easier and more fulfilling.
Best Composting Materials
Compost is the result of decomposed organic materials and waste.
Its microbial activities promote the breakdown of waste that results a stable mixture of perfect organic fertilizer.

Compost isn’t too finicky. There are some that don’t use food scraps for example, and only plant materials. Others, like the in-home composts, seem to be mostly food scraps. But even these have things like vegetable scraps.
The ideal composting material ratio that’s recommended is 30-parts “browns” (carbon-rich materials), to 1-part “greens” (nitrogen-rich materials).
“GREENS”
- Plant, grass cuttings
- Pulled weeds (non-invasive, non-flowered)
- Seaweed (nutrient-rich & great for heating up the pile, plus full of nutrients)
- Coffee grounds (paper filters can be thrown in too)
- Fresh manure
- Vegetable scraps
Nitrogen is needed protein the microorganisms need for decomposing the compost.
But too much nitrogen generates a bad odor from the protein.
“BROWNS”
- Fresh and dead leaves
- Straw
- Eggshells
- Tea bags
- Sawdust
- Wood ash (if the wood comes from one of those store-bought packaged fire logs, you should not use them.
Browns are high in carbon. Too much carbon slows down decomposition, but just enough gives the microbes a perfect amount of energy.
Manures: Avoid all dog, cat, and pig manures. These can contain parasites that are harmful to humans and should not be composted and used on your plants and soil.
Also, manure should be composted before using on your garden or farm. Fresh manures should be avoided.
What Not To Compost
- Plastic bags
- Coat hangers
- Glass bottles
- Yogurt cups
- dog, cat or pig waste
- Anything plastic
- Toxic materials like dead weeds from Roundup
- Invasive weeds
- Flowered weeds with seeds
- Diseased plants
- Dairy
- Charcoal
They say not use fish bones, meat scraps or animal bones.
Avoiding Pests On Your Pile
Usually this shouldn’t be an issue, as the decomposition process takes hold and neutralizes the odors and attractiveness, but if you’re using food scraps in your compost, you can attract them.
Tips for preventing bad compost critters:
- don’t use meat
- bury your compost
- use a compost tumbler
- use a tarp to cover the compost pile
Composting Methods
The no-turn pile is the traditional compost. No-turn compost piles can work just as good as the popular turned compost piles, and they often times will have more nutrients inside them.

Then you have more easy homemade compost methods like bins, tumblers, trenches, etc.
Here are some of the most used methods after the traditional compost pile:
Compost Piles (Traditional Method)
This is the traditional, best way to compost. Best because it’s easy and requires no special tools or things like bins or tumblers. You simply just pile up your organic matter in a big heap. You can do it indoors, outdoors, on dirt, grass or cement. They say indoors like under a roof of some sort is best because the water evaporates slower and the compost piles retains more nutrients with less sun and rain hitting it.
To get started, simply pile up your materials and watch it start fermenting. Once this starts via oxygen usage, the temperature will increase and soon after the decomposition. If it’s too hot, then the aerobic microorganisms that need oxygen and microbes that don’t like high temps will halt their production and growth. This will make decomposition stop.
So because of this, this is basically the main factor, try to not have it under direct sunshine all day long. Under a tree works good or somewhere where a wall takes away the direct sunshine for a good portion of the day (if outside).
Trench Composting (The “Lazy” Method)
In my opinion the pile is more lazy than this method. This trench compost “lazy” method requires you to simply dig trenches throughout your garden in a strategic way and plop your organic materials inside then cover (the camping poop method).
The organic matter will decompose under the earth and if you do this adjacent to your plants (not directly below), the roots will reach the improved soil quality and plants will benefit. Here’s a good short article on this trench composting method.
And a video for the trench composting method:
Need it faster?
If you want to make your compost decompose faster you can do things like add nitrogen (ammonium sulfate, urea) to make that happen faster.
But an even better method is worm composting. Worm composting gives you compost fast and leaves you with healthy worms which serve multiple purposes for your garden.
Vermicompost (A.K.A. Vermiculture)
Vermicompost is the type of compost that uses earthworms to decompose materials fast.
Earthworms excrete “worm castings” which are full of minerals that plants need to grow.
These include nitrates, phosphorus, magnesium, potassium, and calcium.
When worms consume food scraps and organic waste, the materials go through their digestive system which house hundreds of microorganisms that make enzymes for digesting nutrients from the food scraps, thus changing these nutrients from organic matter into enzymes that serve as nutrients for plants.
The worms give you 2 high-quality end products
- Worm juice: a type of liquid fertilizer
- Vermicompost: a superior compost which is basically just worm manure (also called vermicast or worm castings)
There’s a lot more information on worm composing, but I will create a new post on this when we start to experiment with and actually practice it.
Fermented Mixed Compost (FMC)
On the natural farming side of things, you have this “fermented mixed compost” or FMC.
KNF techniques help transform compost materials into “IMO-rich” compost that’s uber-nutrient dense and readily available for nutrient absorption. (source)
“FMC includes at least one item each from the garden (fallen leaves or fruits), rice field (rice bran, straw), field (litter from oil cake or bean cake and ocean (seaweed, fish waste). The bulk of the material is high-protein animal matter with added plant matter. During fermentation, periodic turning is used to keep temperatures below 50 °C. Excess heat or moisture can produce an unpleasant/foul smell, signaling that the batch is ruined.”
Wiki page on KNF
That KNF wifi page has a lot of great information on this type of compost and on Korean Natural Farming in general.
Trash Can Composting
Bins And Tumblers
We have another post that goes over how to make a compost bin.
In this post, we share a bit about the benefits of bins and we also share information about tumblers which make composting at home easy.

There are newer methods such as the high-rate composting system or the no-turn compost with aeration, but these require heavy machinery and are better for producing industrial amounts of compost for larger natural or organic farms.
How Is Compost Made

Outside of gathering the organic matter that makes the compost, you don’t need much. And you don’t need to do much either.
That’s why they call it easy composting. Checking for temperature and moisture are the main things. Making sure there is air inside is another thing that’s easy to do. And lastly, the carbon to nitrogen ratio. But this usually works out without even knowing about it.
Air Channels
Compost creates “air channels” that then help make the soil more porous. This helps the soil drain better, it creates aeration and helps the roots penetrate the soil deeper in order to have a more hearty plant above (and roots below).
To Turn, Or Not To Turn
TURN FOR OXYGEN: The compost pile needs oxygen to feed aerobic microorganisms that do the decomposing. You want to have around 10% oxygen content in your pile. To do this, you should have a pile that is maximum 5 feet wide and 3 to 5 feet high.
WHEN TO TURN: Turn the pile once per week to give it oxygen again. If you do this once per week, at around the 3 week mark it should be almost fully changed to usable compost.
ARE NO-TURN PILES BETTER? It depends on your needs. Traditional compost piles relied on anaerobic microbes to do most the work. The major benefit here is that the final result is more nutrient dense. The benefit of a turned compost pile is a finer material that decomposes faster. Both work great.
If you have chickens, they can do this work for you for piles. It may not be as good, but if you layer the compost pile nicely with branches and sticks, the chickens plus nice layering can do the trick.
Temperature
Microbes thrive off of different temperatures inside the compost pile. In order to have a high quality compost that isn’t full of weeds waiting to sprout is to get it hot for a certain amount of time. They have compost thermometers you can purchase while getting to know what it takes to get your compost pile up to 130F minimum.
The pile should not get too hot either. Once it surpasses 150F, the beneficial microbes and humic acid properties diminish.
If your compost pile is too small (under 3ft by 3ft), you will have a hard time heating it up. And while you can still have a great quality compost that never reaches 130F, it’s safer to get it sufficiently hot in order to reduce the pathogens inside before using.
Once your pile is finished, the temperature will even out and many say to leave it like this for a few weeks before putting it to use.
Here’s a great video I found on Youtube that shares how to heat up a compost pile without turning it!
Moisture
The problem with overly wet compost: This can end up creating the wrong types of microbes while depleting its nutrients. If it’s rained on, that’s fine, but soaking wet compost piles are worse than dry piles.
If it’s too wet, you’ll need to separate the materials and mix in more dry organic matter. This can range from green waste, food waste, and even human waste!
The problem with dry compost: You can’t have a dry compost pile. It needs to be moist. Getting the decomposing to start will take a longer time. However, fixing dry compost is easier than fixing wet compost.
If it’s too dry, just apply water to fix.
Once your compost pile is ready, it should be at about 50% moisture.
If you grab and squeeze a handful once finished, it should not drip any liquid. But it should feel moist.
Finishing Up And Harvesting Your Compost
As the compost pile decomposes, the temperature will keep up its increased heat. All the stuff you threw in the pile will have shrunken and turned brown or dark.
At a certain point, the temperature of your compost pile will stay at a constant temp. At this point the compost will be considered “homogenous” and should no longer have any weird smells coming off it.
There are various weather factors, but overall, a compost pile can take from 3 to 4 months to finish decomposing. Once it’s fully composted, you will want to bring it indoors, like in a shed or barn or anywhere you can protect it from sun and rain.
This will make sure that you finished compost pile retains its nutrient richness. If protected like this, you can leave it be for a long time and use it as needed while working on new compost piles or bins.
Signs Compost Is Finished
Once ready, compost is heterogeneous, resistant to further decomposition, and is without any odor.
- Ratio of carbon to nitrogen is around 20:1
- All organic materials you’ve thrown in have turned dark brown or even black
- Composted materials texture is now breakable and fragile
- Zero odor
- Its temperature equals its surrounding temp after a few days of sitting there finished
Conclusion: How To Start Composting
You can either make a compost bin, start your own pile, or you can buy a compost bin or tumbler. And if you want to be totally hands off and still enjoy the full benefits of compost, you can just buy compost at bulk.
This video is a short overview for this blog post we have up on our Youtube.
Summary
This post shared how to start a compost pile, the benefits of composting, and then I went over a few alternative easy composting methods such using compost bins and the indoor compost tumbler.
I hope you feel better prepared now on how to make a compost pile, and if you have any questions or comments, please leave one below!
Thanks for coming to our blog.
Have you made your own compost bin?
Do you have any special techniques for making your compost piles good?
We’d love to hear about them. Please let us know below in the comments!
Next Gardening Article: Learn how to turn any dirt (or clay, or sand…) to LIVING Soil.


Hello John. Thanks for sharing such vital information. How can I learn all these in a systematic way? Very interested.